
Hello friends,
For a few years now, it has become a cherished ritual: my Christmas architectural project! This year, I’m sharing all the details so you can create your own masterpiece under the best conditions!
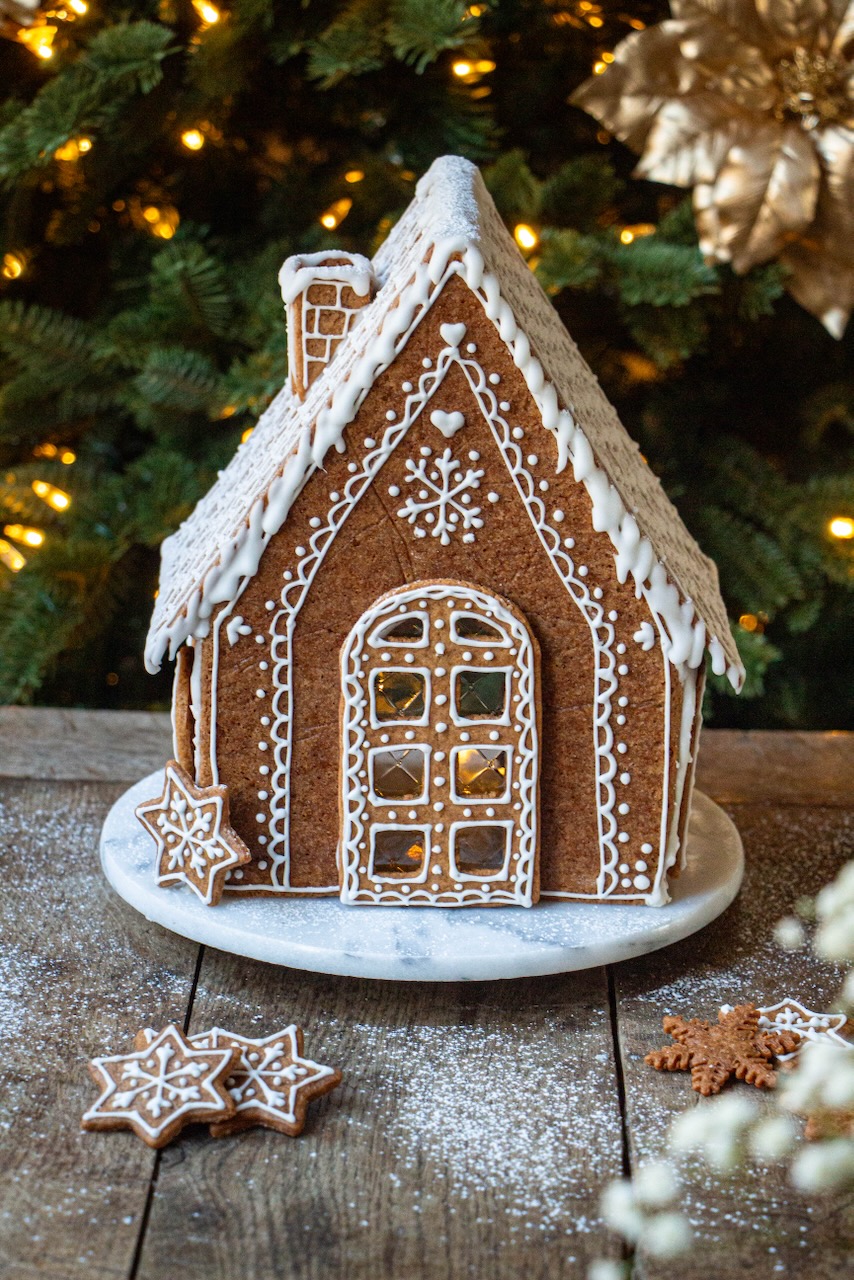
Here is my gingerbread Christmas house!
A little reminder of my previous achievements
My very first house was agingerbread house. This year’s version differs in both the dough recipe and the overall structure. I’m curious to hear which one you prefer!
I also crafted aChristmas house using shortcrust pastry, resembling a greenhouse in a winter garden style…
Additionally, I challenged myself with the creation of myChristmas village (in a towering format) and myScandinavian Christmas village, which will serve as a wonderful centerpiece.
Then, for a less decorative but still delightful treat, I made mychocolate and vanilla Christmas house. Keep me posted on your creations!
The origin of the creation of small houses for Christmas in Alsace
The charming little Christmas houses from Alsace, often made of gingerbread, wood, or ceramic, are a tradition deeply rooted in the winter fantasy of the region.
Inspired by the characteristic half-timbered houses of the area, they evoke the warm and picturesque villages that adorn themselves with lights and decorations during Advent. This tradition dates back to medieval Christmas markets, where artisans and bakers sold figurines, models, and sweets to celebrate the holiday season.
Gingerbread houses specifically trace their roots to the art of Lebkuchen, a specialty from Central Europe. They symbolize warmth, hospitality, and the enchantment of winter.
Today, these decorative or edible little houses have become staples of Alsatian festivities: they are gifted, displayed on tables or beneath the Christmas tree, contributing to the enchanting ambiance of Christmas in Alsace.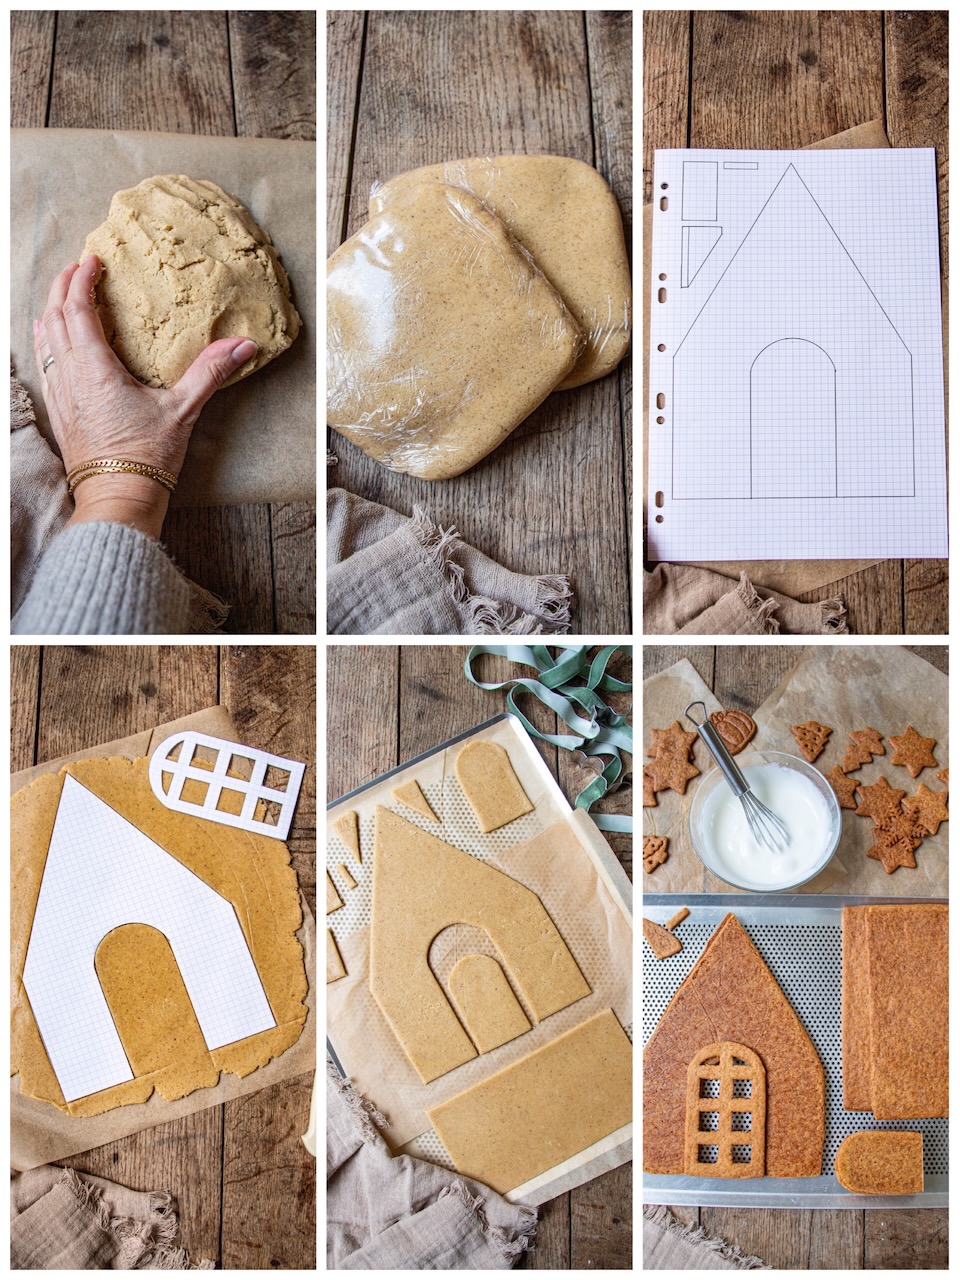
And the Scandinavian version
The small Scandinavian Christmas houses are a Nordic tradition closely tied to winter and light.
In the Scandinavian countries, where the nights are long in December, miniature houses adorned with sugar, spices, and sometimes illuminated with tiny candles offer warmth and joy. This tradition is rooted in the art of gingerbread, which was introduced to Northern Europe in the Middle Ages and popularized in the 19th century.
They represent home, togetherness, and the enchantment of Advent. Nowadays, families create them and display them in their homes throughout the holidays.
In a more contemporary style, you can also find ceramic versions in various decor shops.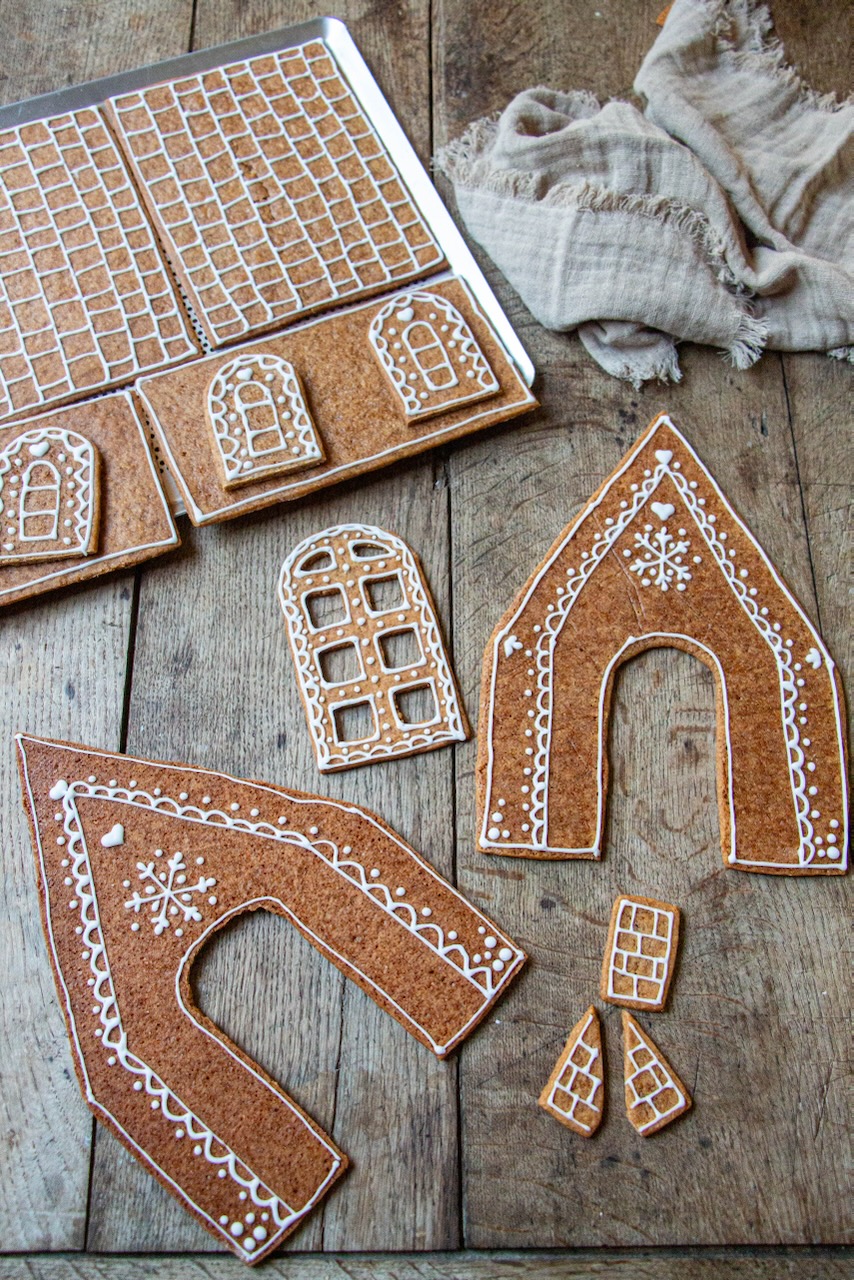
The dough for your Christmas gingerbread house
Now, let’s get back to our gingerbread house! You will be making an eggless shortcrust pastry. The aroma while it bakes will surely delight and fill your kitchen!
If the dough feels overly crumbly, add a tablespoon of milk and work it again until smooth. If it remains too dry, add another half tablespoon of milk, but no more!
As always, I recommend working with very cold dough.
My tips for achieving a well-proportioned Christmas gingerbread house
The most challenging aspect of these homemade recipes is ensuring a successful assembly. Let me explain…
There are two key elements to consider: the dough pieces must maintain their shape during baking, and you need a strong bond between the pieces that holds well.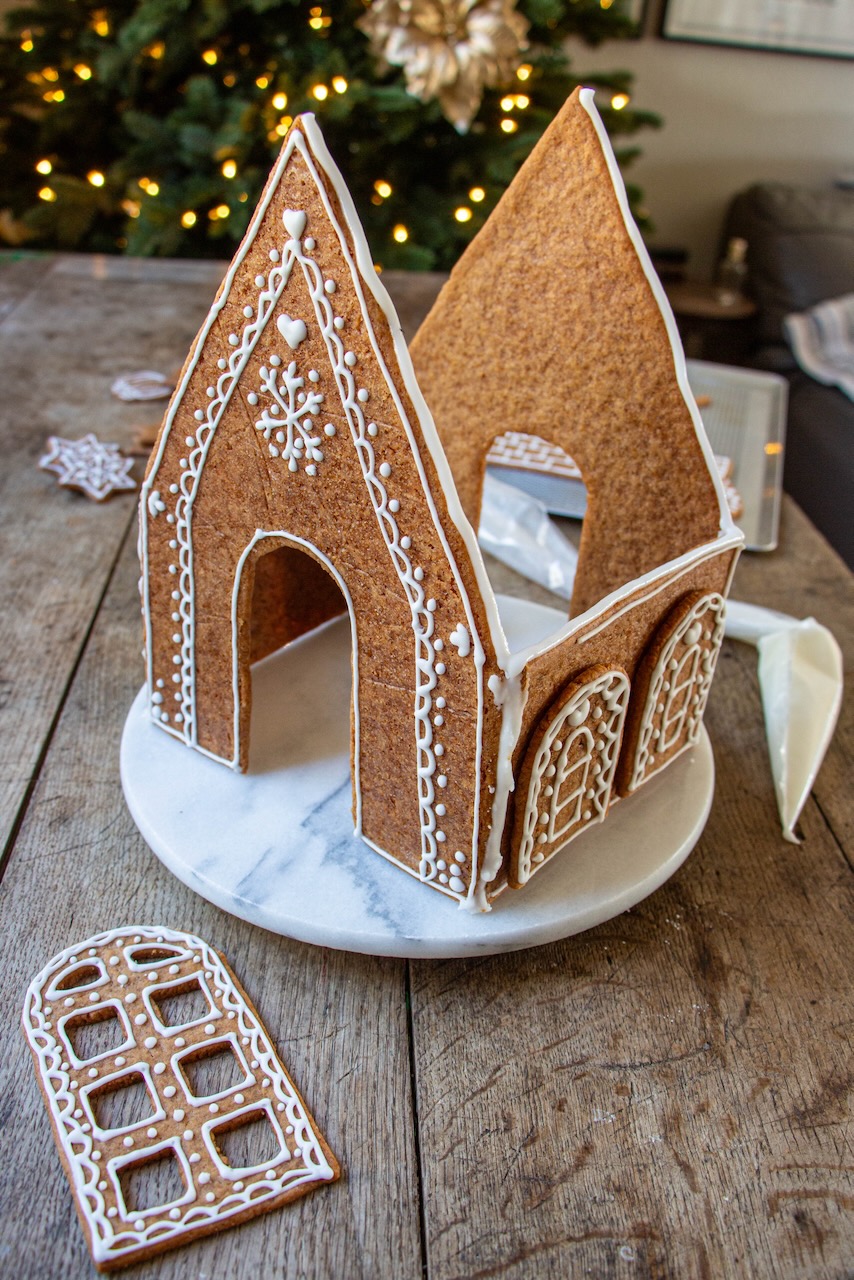
Avoid deformation of the pieces
There’s only one method: cold! (And please, do not add baking powder to your dough; otherwise, you’ll lose control!)
Your dough must rest twice: first, immediately after making it, and then once your pieces are cut out. You will let them « air out » in your fridge. The dough will firm up and may dry out a little, ensuring perfect baking!
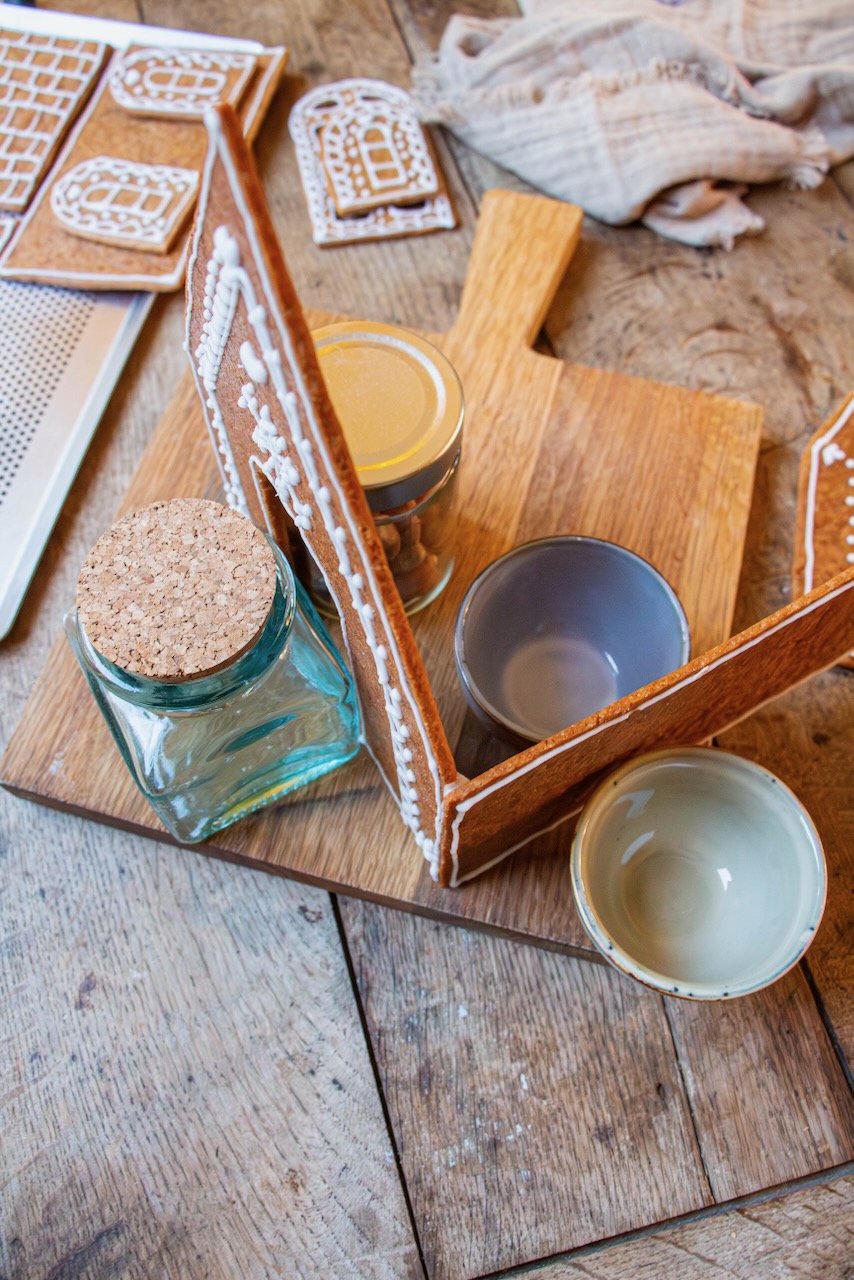
Here are the templates (3 PDF files to print) to create your pieces: wall and door, roof and window, and facade and chimney.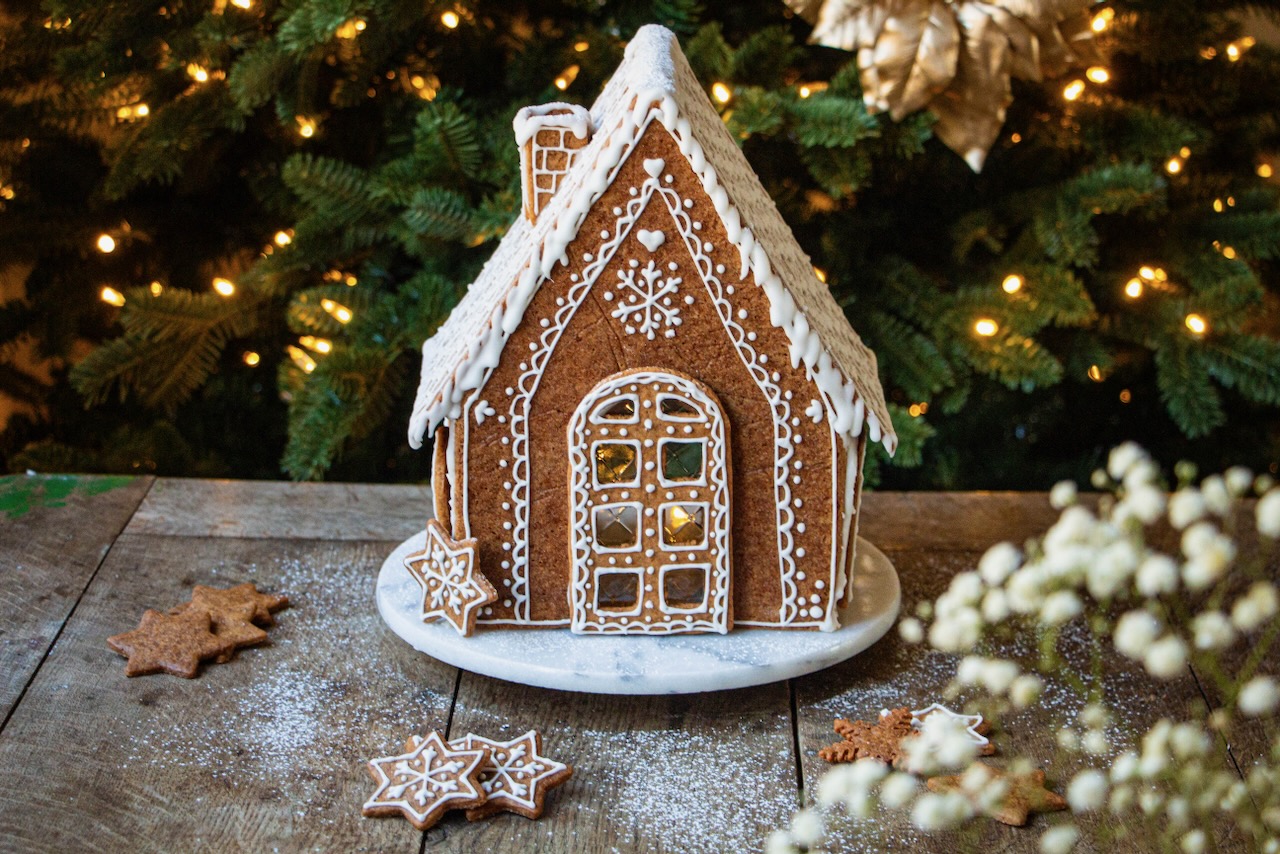
Create a strong bond
Here too, there’s only one method: patience! Allow each layer of adhesive to dry for at least 30 minutes (an hour is even better) before proceeding to the next one. Otherwise, you risk a disaster! Believe me, when everything collapses, you’ll feel like screaming!!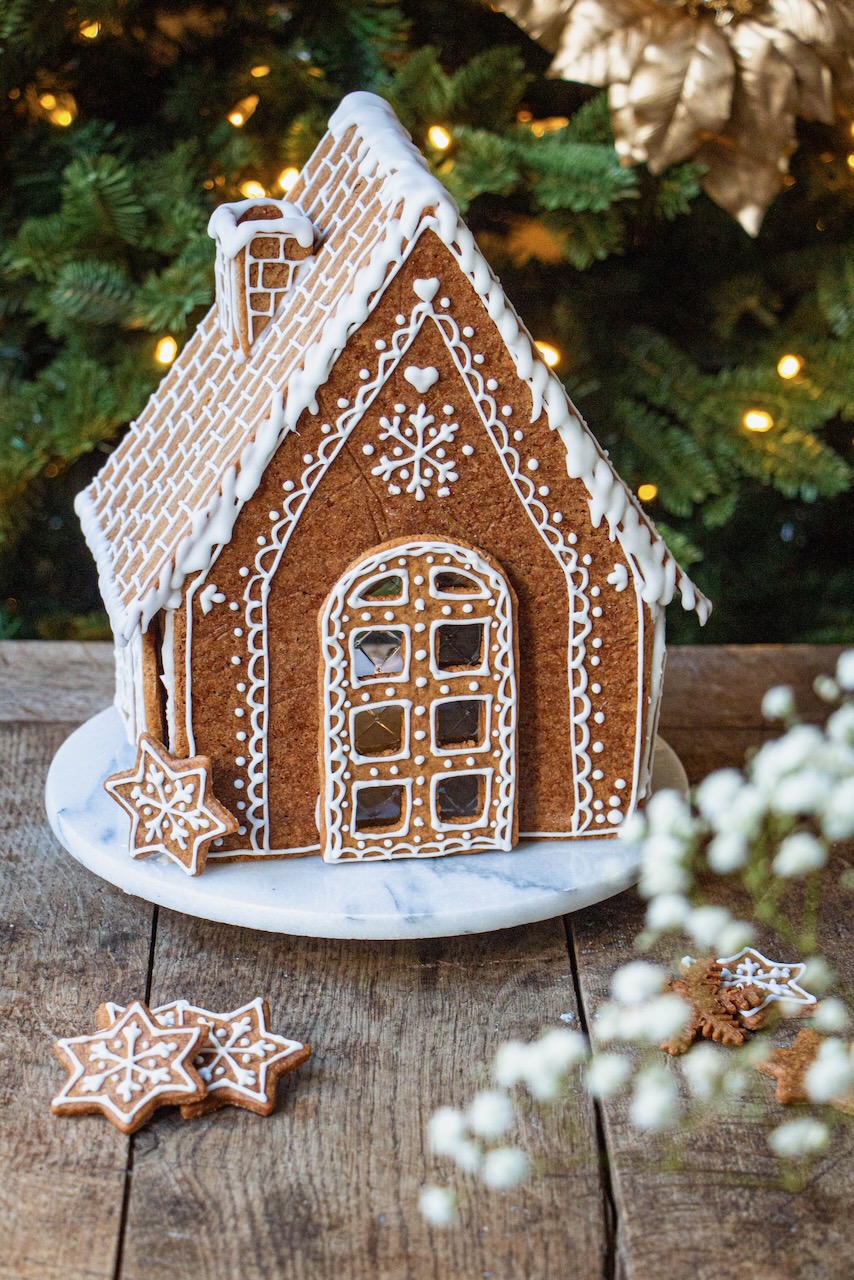
What to do with leftover dough?
Throughout the process of creating your pieces, you’ll likely need to rework the scraps into a ball of dough several times. However, by the end, you may have some leftover dough.
So, what can we do with the leftovers? Cookies! Or use them as decorative elements for your home. We waste nothing!!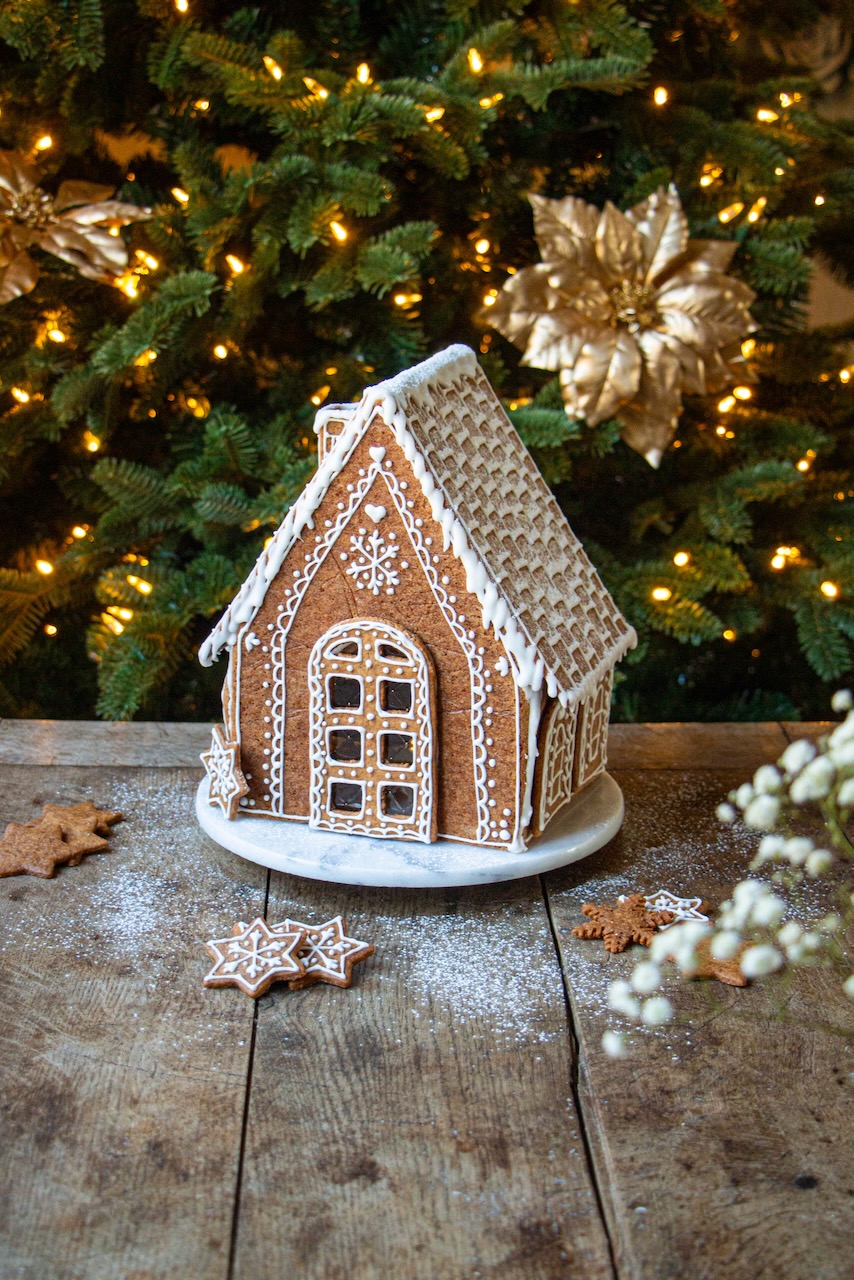
Small organizational point & templates
Organization is key when making your gingerbread house. You’ll see that I set aside 3 days for preparation. This time frame isn’t literal but a suggested duration for your work.
D-2: Make the dough.
D-1: Cut out your pieces using the templates (preparation in the morning and baking in the afternoon).
D: Assembly.
For assembly, start with the walls, then add the roof, and finish with the chimney and the door.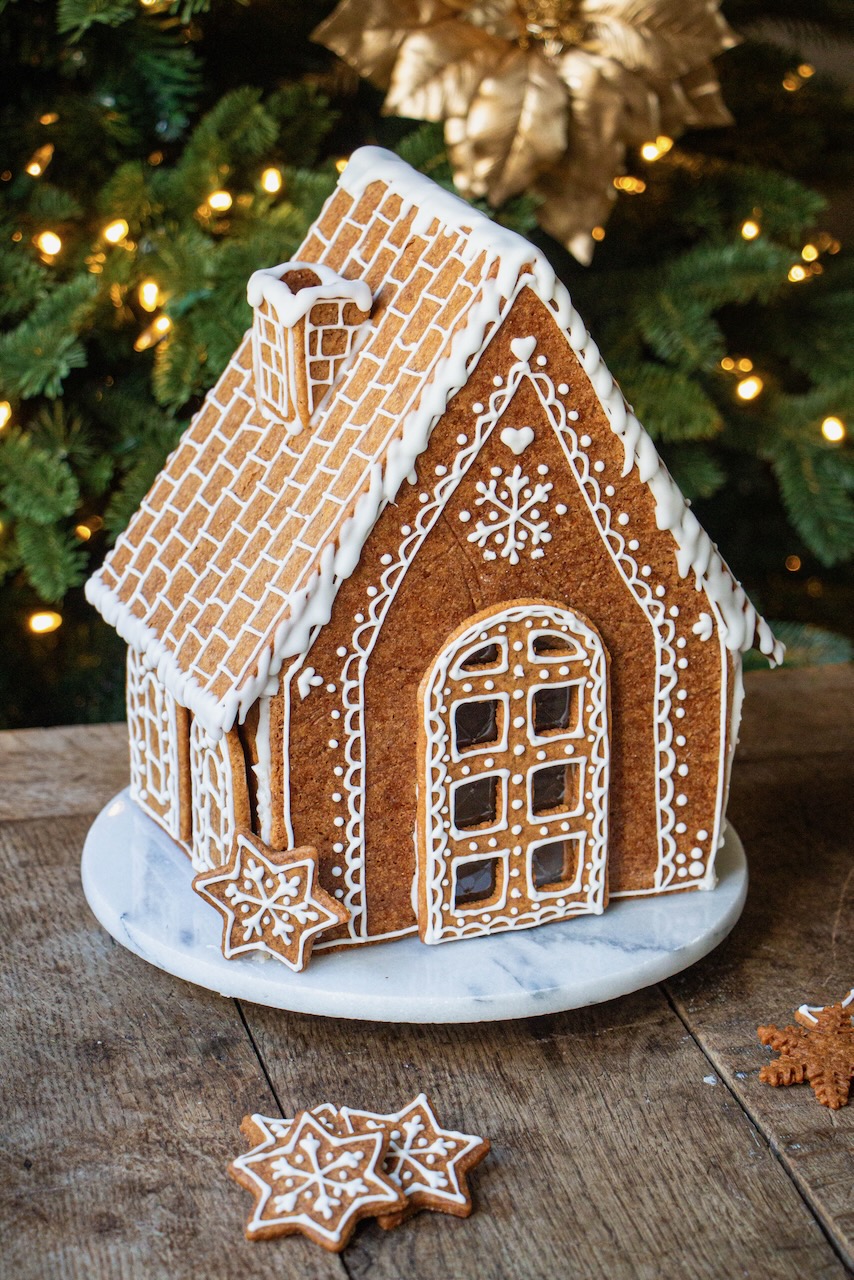
The necessary utensils:
A food processor to mix the dough (or a mixing bowl),
A rolling pin,
2 or 3 baking mats (or parchment paper),
Scissors (to cut your templates),
A knife,
An undipped disposable piping bag (or a freezer bag),
And tall, cylindrical items (like a glass or a bottle) to support your dough pieces during assembly.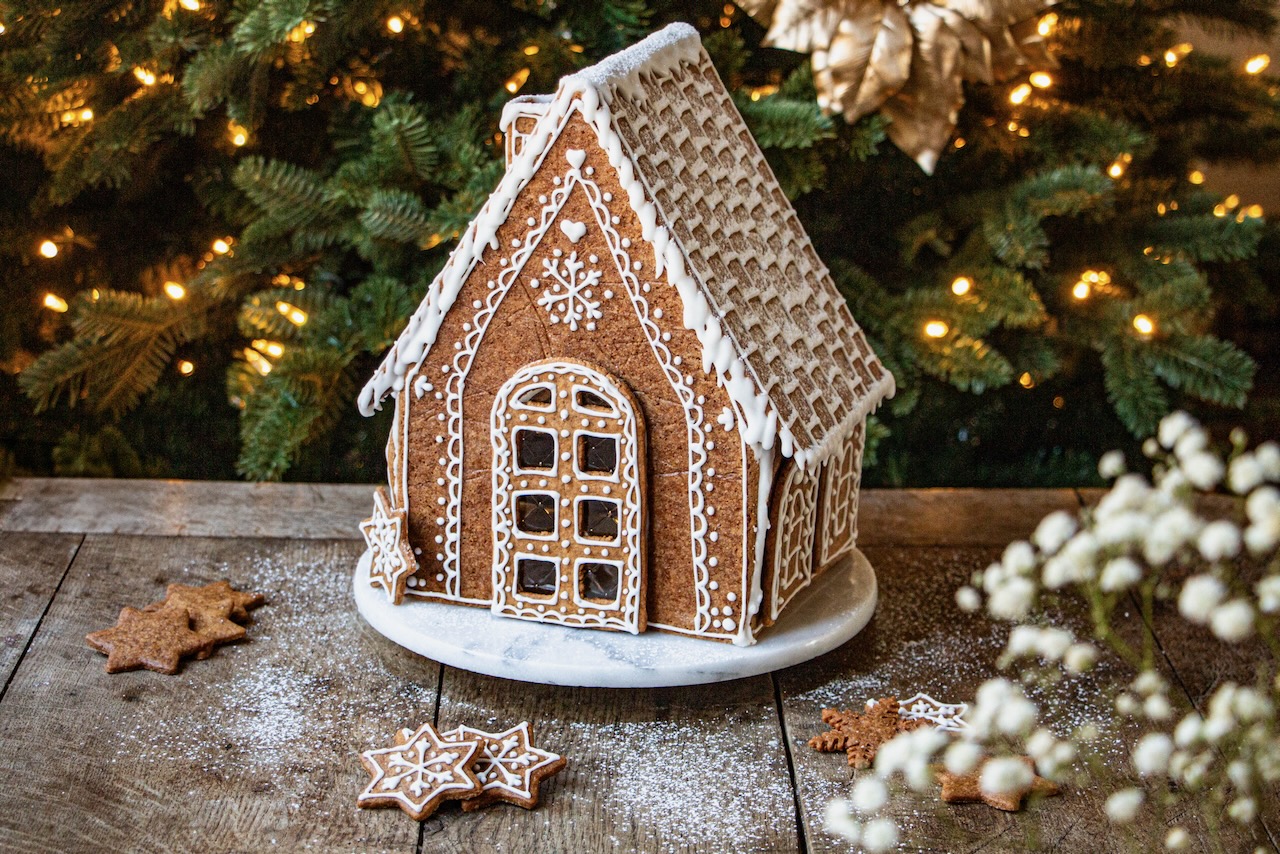 Here it is!! You have all the information you need!
Shall we get started?
The recipe awaits, Chef!
The Gingerbread House
 ( Vote !)
Ingredients
- Dough
- 100 g of butter at room temperature
- 100 g of brown sugar
- 70 g of white or blond sugar
- 150 g of maple syrup
- 360 g of flour
- 1.5 teaspoons of gingerbread spice mix
- 1/4 teaspoon of salt
- 1 tablespoon of milk (optional)
- Icing
- 35 g of egg white (1 white)
- 200 g of icing sugar
- 4 drops of lemon juice
- Decoration
- 1 sheet of gelatin
- 1 tablespoon of icing sugar
Instructions
Dough
Mix the soft butter, sugars, and maple syrup for 2-3 minutes in the bowl of your mixer until you have a smooth texture.
Add the flour, gingerbread mix, and salt. Mix well until you achieve a homogeneous mixture.
Shape into a ball, wrap in plastic film, and refrigerate for 1 hour 30 minutes to 2 hours.
Roll out your dough to a thickness of 4 mm.
Cut out your shapes (the dough must be well chilled). Return to the refrigerator for 1 hour.
After that time, preheat your oven to 160 degrees.
Bake for about 20 minutes.
Once out of the oven, place them on a wire rack to cool.
Royal icing
Put all the ingredients in a bowl.
Mix well until you have a syrupy, homogeneous consistency.
Place the icing in a piping bag fitted with a #4 tip.
Decorate each of your elements as you wish and let dry for at least one hour (longer if possible).
Attach the cut glass to the gelatin sheet with a bit of icing on the door of your house.
Reserve the remaining icing in the piping bag.
Assembly (are you ready?)
Take the back wall of your house, put icing on the underside edge and place the wall on your base.
Stabilize this wall in an upright position with, for example, a rectangular baking dish on each side. Let dry for at least 30 minutes.
Continue by always proceeding in the same way: icing on the underside edge and icing on the common side edge with the piece against which you lean your element. Always allow drying time at each step.
Once you have assembled your walls and everything is well dry, finalize the assembly with the roof and the door.
Secure each joint with icing.
Dust with powdered sugar to create a snow effect.
For the recipe in French, go here.
No Comments